User Interfaces
There are several user interfaces to support different applications. All interfaces offer access to all needed functions to operate a Timepix3. Additional functionality may differ between the interfaces.
Graphical User Interface (GUI)
There is a GTK3-based graphical user interface that offers all functionality needed for operating Timepix3 chips. On the left side of the GUI you can find all scans that are used to prepare a chip for operation and the readout itself. On the right side you can find the relevant settings of the readout system and the chip. With a click on the tab Chip1 (the name changes to the ChipID of the connected chip) you can see an event display for this chip. A click on Default in the lower left of the GUI sets all settings back to default.

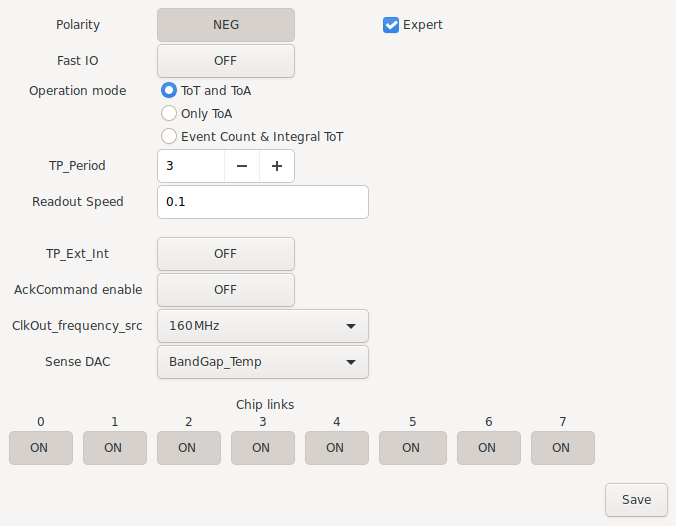
With a click on the Settings button a window opens for general settings of the chip and the readout system. Within this window some additional settings are accessible by checking the expert box. An overview of the available settings is shown here. At the lower end of the window there are additional buttons to switch off individual data links of the chip. After changes to the settings are done they should be saved by a click on the Save button.
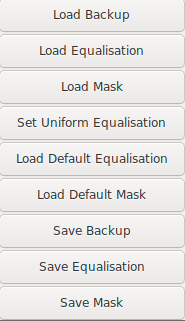
With a right click in the window additional settings are available to load a full set of settings (DACs, mask, equalisation, general settings) with Load Backup. Additionally masks and equalisation files can be loaded with Load Equalisation and Load Mask. The backup, mask and equalisation can be saved with the corresponding save buttons.
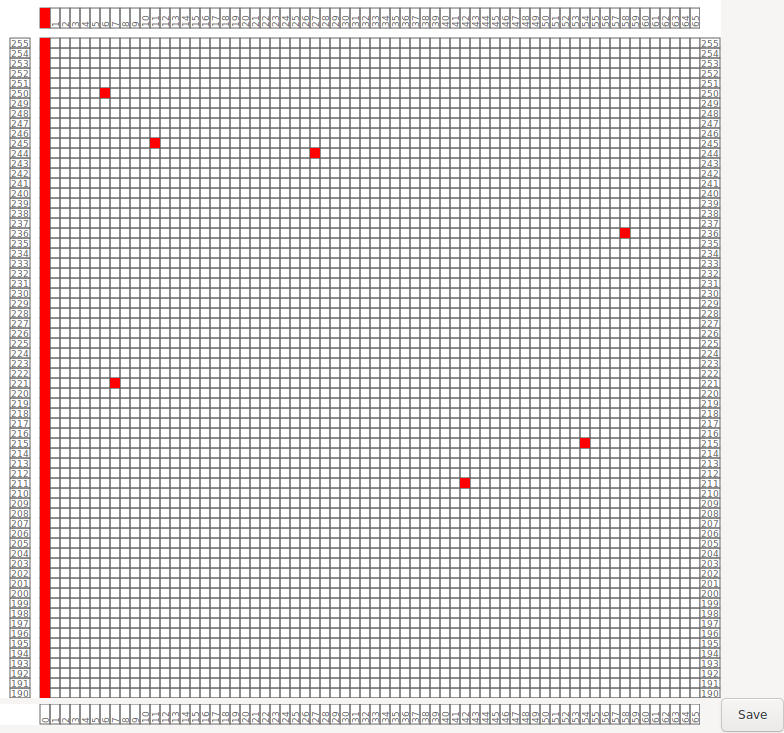
With a click on Set Mask it is possible to edit the current mask (deactivated pixels). In this window masked pixels are shown in red. A click on a pixel switches its status. It is also possible to click on the box for a column or a row to switch the status of the full column or row. For better orientation in the pixelmatrix one can use a right click to show the coordinate of the mouse pointer. There is also the possibility to press the ENTER key to open a text window. In this the status of a pixel, row or column can be changed by a text input:
Command |
Function |
|---|---|
p <x> <y> |
Mask pixel x,y |
up <x> <y> |
Unmask pixel x,y |
c <x> |
Mask column x |
uc <x> |
Unmask column x |
r <y> |
Mask row y |
ur <y> |
Unmask row y |
a |
Mask all pixels |
ua |
Unmask all pixels |
Each text input is applied via another press of the ENTER key. The new mask matrix is saved with a press on the Save button.
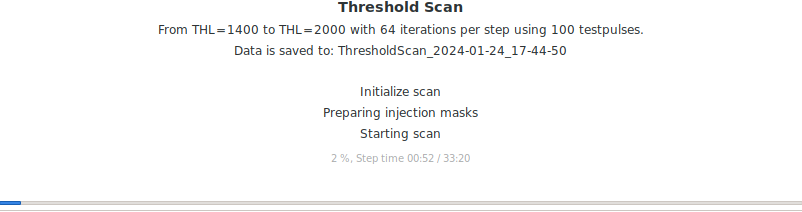
If a scan is active the status of this scan is displayed in the middle of the GUI main window. This status display usually contains the type of the scan, the selected scan parameters, the filename the scan data is saved to, the current step and a progress bar of the current step with the elapsed time and a time estimate. For a readout without a defined end the progress bar is replaced with a time counter. During a scan the button Quit in the lower right of the GUI will change to Quit scan. Pressing this button interrupts the current scan (data taken until this point is still saved in the corresponding file of the scan) without closing the GUI. Only a second press of this button closes the GUI completely.
Command Line Interface (CLI)
tdb
Application Programming Interface (API)
tdb